
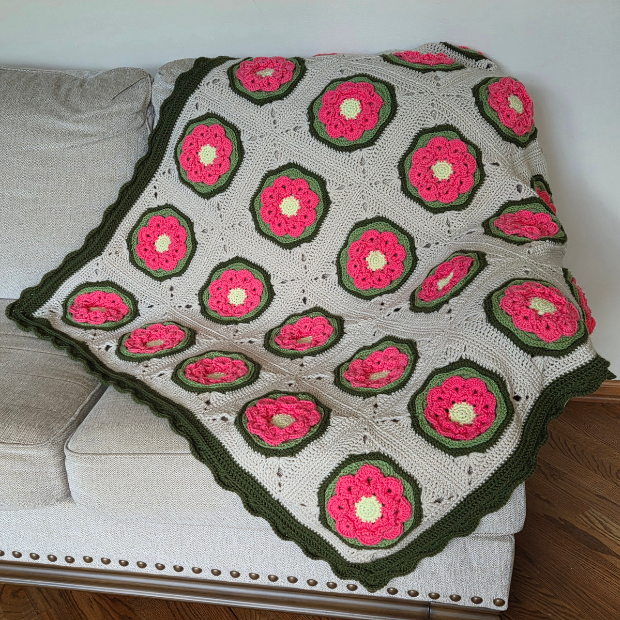
My free granny square rose blanket crochet pattern has beautiful 3D flowers and the handmade afghan can be made in 3 sizes using simple written instructions and a photo tutorial.
This contains affiliate links. I may earn a small commission from purchases made through these links at no extra cost to you.
Quick Info Card
Yarn: Worsted weight 4 yarn (1420 – 3515 yards)
Supplies: US H / 5 mm crochet hook
Difficulty: Intermediate
Highlights: 3 sizes, includes photo tutorial
About my Free Rose Blanket Crochet Pattern
I am so excited to share this free rose blanket crochet pattern with you. I really wanted to create a textured afghan that looks unique, so each granny square features a 3D flower centered right in the middle.
The petals and leaves pop out beautifully, giving the blanket a gorgeous handmade look, and I finished it off with a detailed border that I absolutely love.
The free pattern comes in a classic rectangle shape and includes 3 sizes: small, medium, and large. The small size makes a perfect baby blanket or a cozy lap blanket. If you want something bigger, the larger sizes look amazing as a sofa throw or draped over the end of the bed as a bed throw. You can find more of my blanket patterns here.


How To Crochet A Rose Blanket Using Granny Squares
I loved crocheting this project, and I put together this guide to show you how to crochet a rose blanket using granny squares of your own.
This free afghan pattern is perfect for intermediate makers, so you will get to use a variety of stitches and fun techniques while making the 3D flower squares, joining them together, and adding the border.
Grab some worsted weight 4 yarn and a 5 mm (H) crochet hook, and you are ready to start. Because it comes in 3 sizes, you will need anywhere from 1420 to 3515 yards depending on the size you make.
I made it easy to track by putting the exact yardage needed for each size and color in the chart further down this post, so you can plan out your new baby blanket or throw.
I know how helpful visuals are, so I made sure to include both clear written instructions and a full photo tutorial to guide you through the handmade process.

Upgrade The Knock Out Rose Blanket Crochet Pattern
You can find the ad-free PDF version of my Rose Granny Square Blanket Crochet Pattern in my Etsy and Ravelry shops.



Knock Out Rose Blanket: Free Crochet Pattern
Crochet pattern information
Crochet Supplies:
US H / 5 mm crochet hook
Hobby Lobby I Love This Yarn, weight (4) worsted, 100% acrylic, 355 yds / 325 m, 7 oz / 199 g per skein.
Shown in: Color 1 – Buttercup, Color 2 – Tropical Pink, Color 3 – Mid Green, Color 4 – Dark Olive, Color 5 – Linen

Abbreviations:
Written in US terms
blo: back loop only
ch: chain
ch-sp: chain space
dc: double crochet
fpsc: front post single crochet
hdc: half double crochet
rep: repeat
rnd: round
RS: Right Side
sc: single crochet
sk: skip
sl st: slip stitch
sp(s): space(s)
st(s): stitch(es)
tr: treble crochet
v-st: v stitch
WS: Wrong Side
Yo: yarn over
Special Stitches:
Small Cluster Stitch:
Insert hook into the sp, yo and pull up a loop (2 loops on hook), yo, insert hook into the same sp, yo and pull up a loop (4 loops on hook), yo, pull through all 4 loops, ch 1.
Sc Join:
Squares are joined together using a sc join. When joining, you will have one square that has a sc row complete (referred to as square A), and one square you will be working a sc row into (referred to as square B).
Remove loop from hook, insert hook into first st (or sp) of square A from front to back, place loop back on hook and pull through to front. Work sc as normal into first st (or sp) of square B. Sc join complete. Rep instructions for each st (or sp) across square.
Ch Join:
When working a sc join you will do a ch join across each ch-2 sp. Remove loop from hook, insert hook into ch from front to back and replace loop on hook, pull loop through to front of work, ch 1. Rep for second ch.
Gauge:
14 dc sts x first 7 rounds of flower = 4” (10 cm)
Finished measurements:
Each square measures 9” (23 cm) x 9” (23 cm) blocked
Blanket Measurements: Small (Medium, Large)
| Size | Square layout | Width | Length |
| Small | 3 x 4 (12 squares) | 30” / 76 cm | 40” / 101 cm |
| Medium | 4 x 5 (20 squares) | 40” / 101 cm | 50” / 127 cm |
| Large | 5 x 6 (30 squares) | 50” / 127 cm | 60” / 152 cm |
Notes:
- Squares are worked in the round. Corners are created with color 5.
- Most rounds are worked on the RS, pay close attention to the instructions to work from the WS.
- Ch 3 and Ch 4 at the beginning of the round counts as a st throughout pattern.
- Fasten off after each color leaving a long tail to weave in.
- Photos have been provided after row instructions for many steps of the pattern.
Copyright Notice:
Pattern is sole property of Carol Hladik Designs. Please do not copy or reproduce in any way. You are welcome to sell finished items made from this pattern, but please credit me as the designer in your posts.

Free Crochet Pattern: Knock Out Rose Blanket
Squares: Make 12 (20, 30)
With Color 1
Rnd 1 (RS): Working into a magic circle, sc 8, pull tight, sl st to first st to join. (8 sc)
Rnd 2: Ch 1, 2 sc in each st around, sl st to first st to join. (16 sc)
Rnd 3: Ch 1, *sc in first st, 2 sc in next st; rep from * around, sl st to join. (24 sts)
Circle should measure approx. 2” (5 cm) in diameter.
Fasten off.
With Color 2
Rnd 4: Sl st to join in any st, ch 1, beginning in same st as join, *sc 2, ch 3, sk 1; rep from * around, sl st to join. (16 sc, 8 ch-3 sps)

Rnd 5: Ch 1, sk first st, *sc between 2 sc sts of Rnd 4, ch 1, 3 small cluster sts in ch-3 sp, ch 1; rep from * around, sl st to first sc to join. (24 small cluster sts, 8 sc)
Your piece will not lay flat at this point.

Rnd 6: Ch 4 (counts as a dc, ch 1), dc in same st (v-st made), *ch 1, sc in top of 2nd small cluster, ch 1, v-st in next sc; rep from * around to last sc, ch 1, sc in 2nd small cluster, ch 1, sl st to 3rd ch of starting ch to join. (8 v-sts, 8 sc)

Rnd 7 will be worked around the dc of the v-sts of Rnd 6.
Rnd 7: *Ch 1, 3 hdc down first dc of v-st, ch 1, 3 hdc up second dc of same v-st, ch 1, fpsc around sc; rep from * around, sl st to first hdc to join. (8 petals, 8 fpsc)


Press petals forward so you can work Rnd 8.
Rnd 8: Ch 1, sl st in center ch-1 sp of v-st from Rnd 6, ch 3, 7 dc in same ch-sp, *ch 1, fpsc around same sc as fpsc of Rnd 7, ch 1, 8 dc in center ch-1 sp of next v-st; rep from * around to last v-st, ch 1, fpsc around sc, ch 1, sl st in ch-3 to join. (8 petals, 8 fpsc)


Turn to work on WS.
Rnd 9 (WS): Ch 1, *fpsc around fpsc of Rnd 8, ch 5; rep from * around working into each fpsc, sl st to first fpsc to join. (8 sc, 8 ch-5 sps)
Flower should measure 5.75” (14 cm) diameter
Fasten off.
With Color 3
Turn to work on RS. Pull petals forward as you work into the ch-5 sps of Rnd 9.
On the dc* of Rnd 10 you will be catching the back loop of the flower petal as follows: Yo, insert hook into ch-sp, yo, pull up a loop, yo, pull through 2 loops, insert hook through back loop of top of petal on the hook, yo, pull through all loops.


Sl st to any ch-5 sp near the sc to join.

Rnd 10 (RS): *ch 1, sk the sc, [sc, hdc, dc, dc, dc, hdc, sc] all in the ch-5 sp; rep from * around, sl st to ch-1 to join. (56 sts)
Rnd 11: Ch 3, 7 dc in same ch-1 sp, sk 3 sts, *sc in middle dc of leaf, sk 3 sts, 8 dc in ch-1 sp; rep from * around to last ch-1 sp, sk 3, sc in middle dc, sk 3, sl st to ch-3 to join. (64 dc, 8 sc)
Turn to work on WS.
Rnd 12 (WS): Ch 1, sl st in sc, ch 1, fpsc around, sl st to first fpsc to join. (72 fpsc)
Fasten off. Flower should measure 6” (15 cm) diameter.

With Color 4
From WS, sl st around the post of first st of Rnd 12 to join.

Turn to work on RS.
Rnd 13 (RS): Ch 1, Working into the blo around, sc in same st and next 3 sts, *2 sc in each of the next 2 sts, sc 7; rep from * around to last 5 sts, 2 sc in each of the next 2 sts, sc 3, sl st to first sc to join. (88 sts)
Turn to work on WS.
Rnd 14 (WS): Ch 1, fpsc around, sl st to first fpsc to join. (88 fpsc)
Fasten off.
Flower should measure 7” (18 cm) diameter.

With Color 5
Turn to work on RS.
Rnd 15 (RS): Attach yarn with a sl st into the first st of Rnd 12, ch 4 (counts as a tr), [3 tr, ch 4, 4 tr] all in the same st as join, *sk 4, sc 13, sk 4, [4 tr, ch 4, 4 tr] all in the next st; rep from * two more times, sk 4, sc 13, sk 4, sl st to ch 4 to join. (52 sc, 32 dc, 4 ch-4 sps)
Rnd 16: Ch 3 (counts as a dc), *dc in each st to corner, [2 dc, ch 2, 2 dc] all in corner ch-4 sp: rep from * to last corner, dc 17, sl st to ch 3 to join. (100 dc, 4 ch-2 sps)
Rnd 17: Ch 1, *sc in each st to corner, [sc, ch 2, sc] all in corner ch-2 sp: rep from * to last corner, sc 19, sl st to first st to join. (108 sc, 4 ch-2 sps)
Fasten off.
Square will measure approx. 8.5” (21.5 cm).
Once blocked, square should measure 9” (23 cm)

Assembling the blocks
Continuing with Color 5: Line up squares by rows and columns. Rows will be left to right (or side to side) and columns will be top to bottom. You will begin by seaming Row 1 of blocks.
For the sample I made a throw size which is 5 squares wide (rows) and 6 squares long (columns), so I will be seaming 5 squares for my first row.
All seams will be worked on RS of blocks.
Step 1: Seaming the top of the row.
Beginning in the corner ch-sp, attach yarn with a sl st. Ch 1, *sc in corner ch-sp, sc across to next corner ch-sp, sc in ch-sp**, ch 2; rep from * across attaching each new
square after each ch 2, ending last square at **. (29 sc across each square, ch 2 between each square; sample size: 145 sc, 4 ch-2 sps)
Step 2: Seaming the bottom of the row.
Rotate work so you are working across the bottom of the squares you just joined. Repeat instructions for Step 1 so both sides of the row are attached in a strip.

Step 3: Seaming between the squares.
Make a slip knot in your yarn, but do not place it on your hook yet. Insert hook into the first ch of the ch-2 sp near the bottom of the row, place loop on hook and pull through, ch 1 to secure. Turn to work across square, sc across one square to opposite ch-2, turn, ch join across ch-2 sp, turn, sc join across second square, ch join in last ch, fasten off. (29 sc across each square)


Step 4: Attaching two squares together.
Row 2 and beyond will be attached one square at a time for the length of the row. The bottom of Row 1 (and beyond) already has a row of sc and will be referred to as A.
Insert hook from front to back in first st of A and place a slip knot on the hook. Pull through to front and ch 1 to secure. *Sc join across square, ch join across ch-2 sp; rep from * to end of row.
Rep Step 2
Rep Step 3
Continue to rep Step 4, Step 2, and Step 3 until desired length is achieved.
Step 5: Border
With color 5
Rnd 1: Attach yarn with a sl st in first st to work across bottom row, ch 1, *sc in each st across square (29 sts), (sc, ch 1, sc) across join*; rep to end of row, ch 2, turn to work across side of blanket.
Top and bottom of blanket had a row of sc worked across them in the join, so you will need to work a sc into the end of these rows.
**Sc in end of first row, Rep * to * across to last join, sc in each st across last square, sc in last row, ch 2**, turn to work across top of blanket.
Rep * to * across top of blanket, ch 2, turn to work across side of blanket, rep ** to **, sl st to first st to join. Fasten off.
With Color 4
Rnd 2: Attach yarn with a sl st in corner ch-2 sp to work across the bottom of the blanket. Ch 1, *(sc, ch 2, sc), in corner, sc in each st and ch to next corner; rep from * around, sl st to first st to join. (Top and bottom: 31 sc per square, 1 sc in each ch-1 sp / Sides: 32 sc across first and last square, 31 sc per center square, 1 sc in each ch-1 sp) [Sample: Top / Bottom 159 sts each, Sides 193 sts each]
Rnd 3: Ch 1, hdc in first st, *(hdc, ch 2, hdc) in corner, hdc in each st across to next corner; rep from * around to last corner, hdc in each remaining st across, sl st to first st to join. [Sample: Top / Bottom 161 sts each, Sides 195 sts each]
Rnd 4: Ch 3, dc in next st, *(dc, ch 2, dc) in corner, dc in each st across to next corner; rep from * around to last corner, dc in each remaining st across, sl st to first st to join. [Sample: Top / Bottom 163 sts each, Sides 197 sts each]
Rnd 5 (WS): Ch 1, turn to WS, *fpsc around each st to corner, (sc, ch 2, sc) in corner; rep from * around to last corner, fpsc around each st to last st, sl st to first st to join. [Sample: Top / Bottom 165 sts each, Sides 199 sts each]
Rnd 6 (RS): Turn to RS, ch 3, *hdc in each st to corner, (hdc, ch 2, hdc) in corner; rep from * around to last corner, hdc in each remaining st across, sl st to first st to join. [Sample: Top / Bottom 167 sts each, Sides 201 sts each]
Rnd 7: Ch 1, *sc one st behind (this is the last st of Rnd 4), ch 1, sk 4, 7 dc in corner, *ch 1, sk 4, sc, ch 1, sk 4, 7 dc in next st; rep from * around working 7 dc in each corner ch-sp. [This may require you to sk 3 or 5 sts before the corner instead of 4 depending on the size you make. Adjust as follows: if skipping 3 or 4 sts, ch 1, sk 3, 7 dc in corner; if skipping 5 sts, ch 2, sk 5, 7 dc in corner], sl st to first st to join.
Rnd 8: Ch 1, *sc in sc st, sc in ch-1, work into the 7 dc as follows: sc, sc, 2 sc in 3rd dc, sc, 2 sc in 5th dc, sc in last 2 dc, sc in ch-1; rep from * around, sl st to first st to join.
Fasten off.

